
Contents
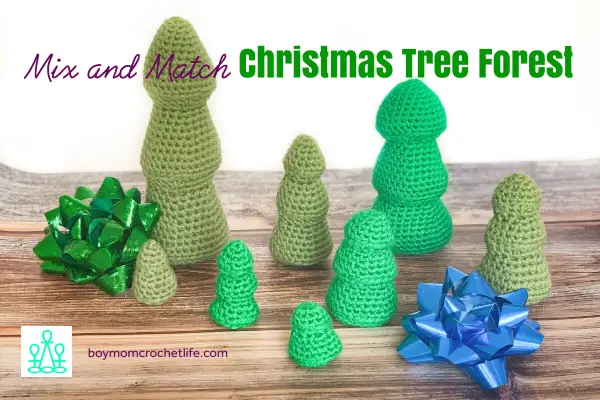
If you enjoy DIY, then it’s no different at Christmas time. These delightful little crochet Christmas trees are a quick project and you can make as few or as many as you want!
I am so excited to place these all around my house this Christmas, making the whole house a little Christmas tree forest!
(I guess technically that would be a pine tree forest, but I like the idea of it being a Christmas tree forest better)
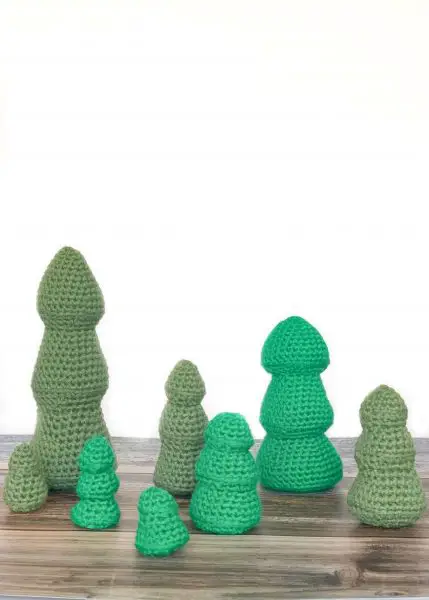
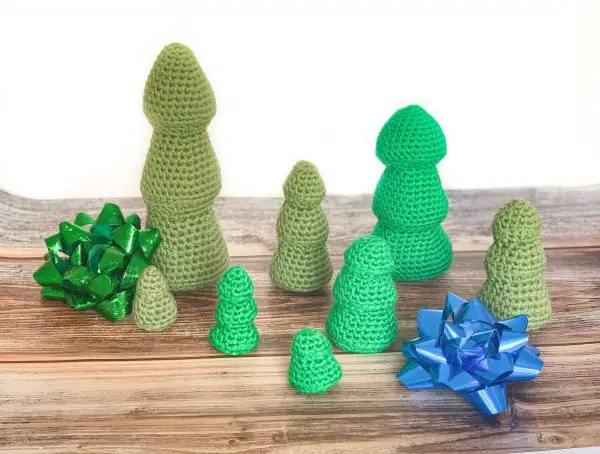
I think my favorite part is that there are 4 different sizes of trees, from itty bitty to a decent sized “big” tree (8.5 inches tall). So you can mix and match depending on the sizes and styles you like the best!
The two middle sizes do look somewhat similar, but one is a skinnier tree that pairs really well with the biggest tree (in case you only wanted to do two that match) and the other is a bit fatter of a tree that pairs better with the smallest tree.
When C saw all of them together he said, “Hey, that’s like in Little Blue Truck!” The Christmas version indeed has several different sized and shaped trees that the Little Blue Truck and his friend Toad deliver to all of their friends.
(So if you wanted a great gift idea for a little one, you could make these and add them to the Sleepy Time Truck and make your own version of Little Blue Truck’s Christmas!)
How to Crochet Christmas Trees
The best part is, you really don’t need a whole lot to get started- just some green yarn, a 4.5 mm crochet hook and something to stuff it with! A tapestry needle would also be great to have, but really, you could pull the tail through the loops with the crochet hook and then tie it in a knot if you don’t have one.
However, it may not sit the way you want and may not be as durable.
You’ll also need something to mark the first stitch of each round. That could be a stitch marker you bought or it could be a spare piece of yarn that you use (and you could also use spare pieces of yarn to stuff your trees!).
So in addition to being a quick project, it can be pretty economical, too!
So let’s get to it!
While you’re here, don’t forget to sign up to my newsletter for tips, tricks and resources in your inbox!
Mix and Match Christmas Tree Forest Crochet Pattern
Want an ad-free PDF? You can purchase one on Ravelry!
Some of the links in this article are “affiliate links”, a link with a special tracking code. This means if you click on an affiliate link and purchase the item, I will receive an affiliate commission. The price of the item is the same whether it is an affiliate link or not. Regardless, I only recommend products or services I believe will add value to you. I hope these links are as helpful as possible for you!
Yarn Information
I used Loops and Threads Impeccable in Forest, but any worsted weight (#4) yarn in your favorite color will work. (I love the Paintbox yarns from Lovecrafts in Pine Green or Grass Green to either match what I have or to add a nice pop of green!)
Yardage- 106 yards for all four trees, broken down as follows:
- 7.5 yards for the smallest tree
- 20 yards for the small tree
- 25 yards for the medium tree
- 54 yards for the tallest tree
Hook Information
4.5 mm crochet hook (size 7) (here’s an affordable option if you don’t have one)
Other Notions
- Tapestry Needle
- Stuffing medium (fiber fill like Poly fill or yarn ends)
- Scissors
- Stitch Marker
Gauge
4 stitches and 4.5 rows in 1 inch by 1 inch. Gauge is not crucial to the pattern, but if it does not match, your trees will be different sizes. The size can also vary depending on how much or how little you stuff your trees.
Finished Dimensions
- Smallest tree- 2.25 inches tall by 1.25 inches wide
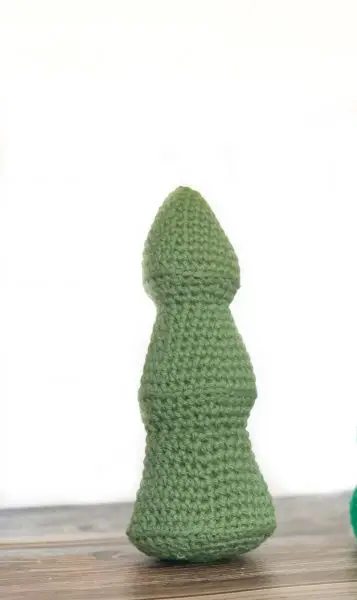
- Small tree- 4.25 inches tall by 2.75 inches wide
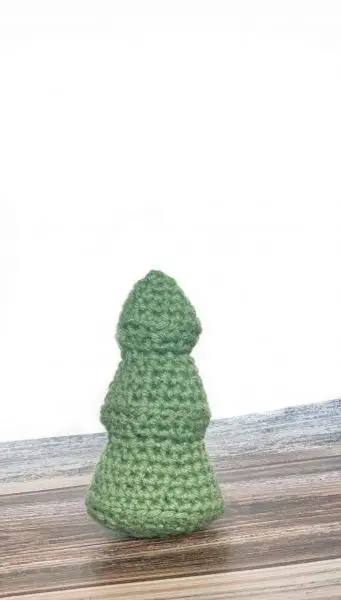
- Medium tree- 5 inches tall by 2.75 inches wide
- Tallest tree- 8.5 inches tall by 3.25 inches wide
Abbreviations
This pattern is written using US terms.
MR- magic ring
Inc- increase
Sc- single crochet
Dec- decrease
BLO- back loop only
FLO- front loop only
Rep- repeat
st(s)- stitch(es)
[ ]- denote a group of stitches that is repeated as many times as stated.
If the number follows the abbreviation (such as “inc 5”), you will work the instructed stitch that many times over successive stitches (in the example, increase in each of the next 5 stitches).
Crochet Christmas Trees Free Pattern
4 Different Sized Christmas Trees to mix and match! All four trees are worked in the spiral round. Be sure to use a stitch marker to mark the first stitch of each round so you don’t lose your place!
Smallest Tree

You will start with a magic ring and chain 1, then single crochet 5 into the magic ring. Do not join.
Continue working in a spiral as follows, being sure to mark your first stitch of each new round with your stitch marker:
Round 2: inc 5. (10)
Round 3: sc 10. (10)
Round 4: [sc in first st, inc in next st], rep [ ] four more times. (15)
At this point, you want to weave in your beginning end.
Round 5: In BLO, [sc in first st, dec], rep [ ] four more times. (10)
Round 6: In FLO, [sc in first st, inc in next st], rep [ ] four more times. (15)
Now is a good time to stuff the top of the tree, but be sure not to overstuff!
Round 7: sc 15. (15)
Round 8: [sc in first 2 sts, inc in next st], rep [ ] four more times. (20)
Round 9: sc 20. (20)
Round 10: In BLO, [sc in first 2 sts, dec] rep [ ] four more times. (15)
Round 11: [sc in first st, dec], rep [ ] four more times. (10)
Finish stuffing the tree, again being sure not to overstuff.
Round 12: dec 5. (5)
Fasten off and cut your yarn leaving a 6 inch tail. Weave through the front loop of the 5 remaining stitches and pull tight. Weave in remaining end.
Want some other Christmas cuteness? Check out this adorable Cuddly Santa Claus pattern!
Small Tree

You will start with a magic ring and chain 1, then single crochet 5 into the magic ring. Do not join.
Continue working in a spiral as follows, being sure to mark your first stitch of each new round with your stitch marker:
Round 2: inc 5. (10)
Round 3: [sc in first st, inc in next st], rep [ ] four more times. (15)
Round 4: sc 15. (15)
Round 5: [sc in first 2 sts, inc in next st], rep [ ] four more times. (20)
At this point, you want to weave in your beginning end.
Round 6: In BLO, [sc in first 2 sts, dec], rep [ ] four more times. (15)
At this point, you want to firmly stuff the top of the tree, being sure not to over stuff it.
Round 7: [sc in first st, dec], rep [ ] four more times. (10)
Round 8: In FLO, [sc in first st, inc in next st], rep [ ] four more times. (15)
Round 9: [sc in first 2 sts, inc in next st], rep [ ] four more times. (20)
Round 10: sc 20. (20)
Round 11: [sc in first 3 sts, inc in next st], rep [ ] four more times. (25)
Round 12: In BLO, [sc in first 3 sts, dec], rep [ ] four more times. (20)
At this point, you want to firmly stuff the middle of the tree, being sure not to over stuff it.
Round 13: [sc in first 2 sts, dec], rep [ ] four more times. (15)
Round 14: In FLO, [sc in first 2 sts, inc in next st], rep [ ] four more times. (20)
Round 15: [sc in first 3 sts, inc in next st], rep [ ] four more times. (25)
Round 16: sc 25. (25)
Round 17: [sc in first 4 sts, inc in next st], rep [ ] four more times. (30)
Round 18: sc 30. (30)
Round 19: In BLO, [sc in first 4 sts, dec], rep [ ] four more times. (25)
Round 20: [sc in first 3 sts, dec], rep [ ] four more times. (20)
Round 21: [sc in first 2 sts, dec], rep [ ] four more times (15)
At this point, you want to finish stuffing the tree, being sure not to over stuff it.
Round 22: [sc in first st, dec], rep [ ] four more times. (10)
Round 23: dec 5. (5)
Fasten off and cut your yarn leaving a 6 inch tail. Weave through the front loop of the 5 remaining stitches and pull tight. Weave in remaining end.
Want more boy mom crochet goodness? Sign up for my newsletter to get tips, tricks and resources!
Medium Tree
You will start with a magic ring and chain 1, then single crochet 5 into the magic ring. Do not join.
Continue working in a spiral as follows, being sure to mark your first stitch of each new round with your stitch marker:
Round 2: inc 5. (10)
Round 3: sc 10. (10)
Round 4: [sc in first st, inc in next st], rep [ ] four more times. (15)
Round 5: sc 15. (15)
Round 6: [sc in first 2 sts, inc in next st], rep [ ] four more times. (20)
At this point, you should weave in your starting end.
Round 7: In BLO, [sc in first 2 sts, dec] rep [ ] four more times. (15)
At this point, you want to stuff the top of the tree, being sure not to over stuff it.
Round 8: [sc in first st, dec], rep [ ] four more times. (10)
Round 9: In FLO, [sc in first st, inc in next st], rep [ ] four more times. (15)
Round 10: sc 15. (15)
Round 11: [sc in first 2 sts, inc in next st], rep [ ] four more times. (20)
Round 12: sc 20. (20)
Round 13: [sc in first 3 sts, inc in next st], rep [ ] four more times. (25)
Round 14: sc 25. (25)
Round 15: In BLO, [sc in first 3 sts, dec], rep [ ] four more times. (20)
At this point, you want to stuff the middle of the tree, being sure not to over stuff it.
Round 16: [sc in first 2 sts, dec], rep [ ] four more times. (15)
Round 17: In FLO[sc in first 2 sts, inc in next st], rep [ ] four more times. (20)
Round 18: sc 20. (20)
Round 19: [sc in first 3 sts, inc in next st], rep [ ] four more times. (25)
Round 20: sc 25. (25)
Round 21: [sc in first 4 sts, inc in next], rep [ ] four more times. (30)
Round 22: sc 30. (30)
Round 23: In BLO, [sc in first 4 sts, dec], rep [ ] four more times. (25)
At this point, you should finish stuffing the tree, still being sure not to over stuff it.
Round 24: [sc in first 3 sts, dec], rep [ ] four more times. (20)
Round 25: [sc in first 2 sts, dec], rep [ ] four more times. (15)
Round 25: [sc in first st, dec], rep [ ] four more times. (10)
Round 26: dec 5. (5)
Fasten off and cut your yarn leaving a 6 inch tail. Weave through the front loop of the 5 remaining stitches and pull tight. Weave in remaining end.
Don’t like naked trees? Check out the Mix and Match Christmas Tree Decorations post to find some adorable adornments!
Tallest Tree
You will start with a magic ring and chain 1, then single crochet 5 into the magic ring. Do not join.
Continue working in a spiral as follows, being sure to mark your first stitch of each new round with your stitch marker:
Round 2: inc 5. (10)
Round 3: sc 10. (10)
Round 4: [sc in first st, inc in next st], rep [ ] four more times. (15)
Round 5: sc 15. (15)
Round 6: [sc in first 2 sts, inc in next st], rep [ ] four more times. (20)
Round 7: sc 20. (20)
Round 8: [sc in first 3 sts, inc in next st], rep [ ] four more times. (25)
Round 9: sc 25. (25)
Round 10: [sc in first 4 sts, inc in next st], rep [ ] four more times. (30)
Rounds 11-12: sc 30. (30)
At this point, you should weave in your starting end.
Round 13: In BLO, [sc in first 4 sts, dec], rep [ ] four more times. (25)
At this point, you want to firmly stuff the top of the tree, being sure not to over stuff it.
Round 14: [sc in first 3 sts, dec], rep [ ] four more times. (20)
Round 15: [sc in first 2 sts, dec], rep [ ] four more times. (15)
Round 16: In FLO, [sc in first 2 sts, inc in next st], rep [ ] four more times. (20)
Round 17: sc 20. (20)
Round 18: [sc in first 3 sts, inc in next st], rep [ ] four more times. (25)
Round 19: sc 25. (25)
Round 20: [sc in first 4 sts, inc in next st], rep [ ] four more times. (30)
Round 21: sc 30. (30)
Round 22: [sc in first 5 sts, inc in next st], rep [ ] four more times. (35)
Rounds 23-24: sc 35. (35)
Round 25: In BLO, [sc in first 5 sts, dec], rep [ ] four more times. (30)
At this point, you want to firmly stuff the middle of the tree, being sure not to over stuff it.
Round 26: [sc in first 4 sts, dec], rep [ ] four more times. (25)
Round 27: [sc in first 3 sts, dec], rep [ ] four more times. (20)
Round 28: In FLO, [sc in first 3 sts, inc in next st], rep [ ] four more times. (25)
Round 29: sc 25. (25)
Round 30: [sc in first 4 sts, inc in next st], rep [ ] four more times. (30)
Round 31: sc 30. (30)
Round 32: [sc in first 5 sts, inc in next st], rep [ ] four more times. (35)
Round 33: sc 35. (35)
Round 34: [sc in first 6 sts, inc in next st], rep [ ] four more times. (40)
Rounds 35-36: sc 40. (40)
Round 37: In BLO, [sc in first 6 sts, dec], rep [ ] four more times. (35)
At this point, you should finish stuffing the tree, still being sure not to over stuff it.
Round 38: [sc in first 5 sts, dec], rep [ ] four more times. (30)
Round 39: [sc in first 4 sts, dec], rep [ ] four more times. (25)
Round 40: [sc in first 3 sts, dec], rep [ ] four more times. (20)
Round 41: [sc in first 2 sts, dec], rep [ ] four more times. (15)
Round 42: [sc in first st, dec], rep [ ] four more times. (10)
Round 43: dec 5. (5)
Fasten off and cut your yarn leaving a 6 inch tail. Weave through the front loop of the 5 remaining stitches and pull tight. Weave in remaining end.
These trees are so cute and I just can’t wait for Christmas time to be here! They’re going to be all over my house! (I’m pretty sure I’ve said that a bunch, but I don’t think my husband is prepared for the amount of tiny crocheted Christmas trees that will be everywhere!)
But do they look a little plain to you? Maybe you would prefer a Christmas tree that looks more, well Christmas-tree like (with the decorations and what not). Check out the Mix and Match Christmas Tree Decorations!
Looking for other Christmas crochet patterns? Check out my Cuddly Santa Claus pattern! He’s great for a decoration or as a play buddy for your little one!
Love this idea? Pin it for later!

