Contents
Happy Friday, everyone!
And happy Mid-Autumn or Moon Festival!
If you haven’t heard of the Moon Festival, it is a holiday in Southeast Asia that is celebrated on the 15th day of the eighth lunar month. It’s basically a holiday that was to celebrate the harvest and has evolved to an important cultural holiday to celebrate family.
The entire time that I was pregnant with C, as well as for the first 16 months of his life, we lived in Hong Kong. While we were there, we got to experience two Moon Festivals and they were seriously as big and important as Christmas is in the US.
Our local park would be decorated to the nines and our friends would exchange moon cakes and red envelopes (and of course I don’t have ANY pictures of this… sigh).
People would be EVERYWHERE as they traveled to be with their families or to enjoy their holiday time off, but since it was such a festive atmosphere, it wasn’t as terrible as it sounds. (Also, people were always everywhere, seeing as how there are so many people in such a small area, but holidays were even crazier!)
I knew that I wanted to mark the Moon Festival with something special, but at first, I wasn’t sure what would really go with it. Sure, I could make a moon cake or a red envelope, but I don’t really see the boys playing with those (unless they were a real moon cake they could eat or a real envelope full of money!)
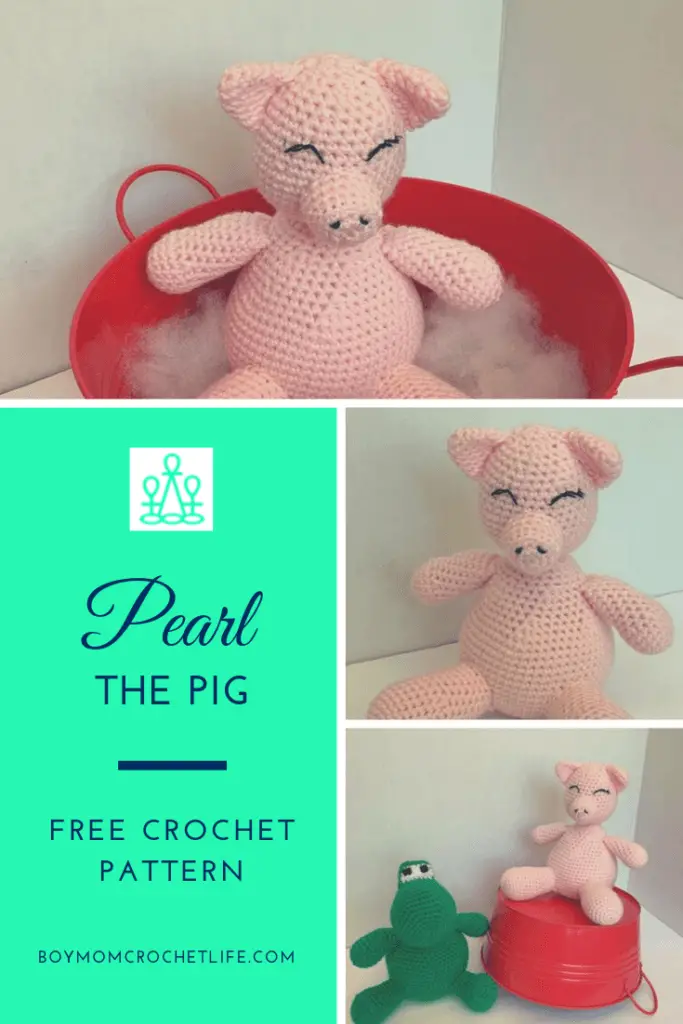
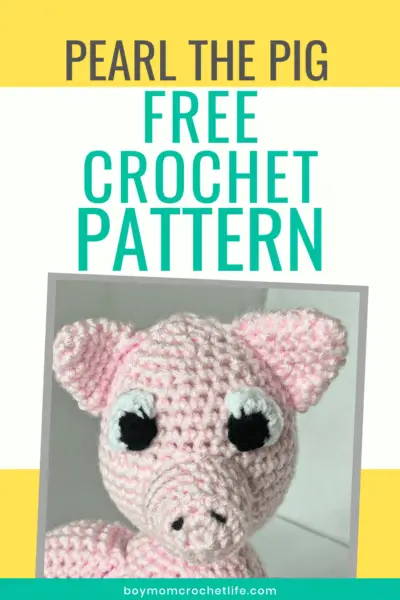
So, I went to the Chinese calendar. This year is the year of the pig. I thought to myself, “Pigs are adorable! I could totally make a fun crochet pig toy for the boys!” Therefore, I bring to you Pearl!
She’s happy to hang out with everyone, but she would much rather be sleeping in a big puddle of mud (or maybe relaxing in a bubble bath when she’s done)! And she loves her friend Daisy the Dino!

This pattern is a great, easy one skein crochet pattern, with no color changes. It’s great for beginner crocheters who are looking to try crochet amigurumi patterns and for advanced crocheters that are looking for a simpler pattern to break up a project list of more difficult choices.
If the recipient of your Pearl is older than 3, safety eyes would look great and you would only need a small amount of embroidery floss or yarn to create the nostrils on the snout. If not, embroidered eyes are the way to go! I decided to make my Pearl a sleepy pig, but a peppy wide-awake Pearl would be adorable too!
Some of the links in this article are “affiliate links”, a link with a special tracking code. This means if you click on an affiliate link and purchase the item, I will receive an affiliate commission- as an Amazon Associate, I earn from qualifying purchases. The price of the item is the same whether it is an affiliate link or not. Regardless, I only recommend products or services I believe will add value to you. I hope these links are as helpful as possible for you!
Now onto the pattern!
Pearl the Pig Crochet Pattern
Skill Level
Easy
Yarn and Hook Size
172 yards I Love This Yarn in Soft Pink (355 y/324.6 m per 7 oz/198.5 g skein); 100% acrylic, worsted weight (4) yarn
1 yard DMC Embroidery Floss in Black (8.7 y/8 m); 100% cotton
OR 1 yard each of I Love This Yarn in White and Black for the crocheted eyes (directions in the Crochet Eyes for Amigurumi post)
Notions
Tapestry needle Scissors Stitch marker Fiber fil l- Eye solution of choice (safety eye, embroidered eye, crocheted eye, etc.)
Measurements and Gauge
Finished dimensions are 9 inches tall by 7.5 inches. Gauge measures at 8 stitches and 9 rows is 2 inches.
Abbreviations
| ch chain | rep repeat |
| dec decrease | rd round |
| inc increase | sc single crochet |
| MR magic ring |
[] denote a group of stitches that repeats as many times as directed
Instructions
Head
Use A
Rd 1: Create MR, ch 1, sc 6 (6)
Rd 2: inc 6 (12)
Rd 3: [sc, inc], rep [] five more times (18)
Rd 4: [sc 2, inc], rep [] five more times (24)
Rd 5: [sc 3, inc], rep [] five more times (30)
Rd 6: [sc 4, inc], rep [] five more times (36)
Rd 7: [sc 5, inc] rep [] five more times (42)
Rds 8-12: sc 42 (42)
Rd 13: [sc 5, dec], rep [] five more times (36)
Rds 14-16: sc 36
Rd 17: [sc 4, dec], rep [] five more times (30)
Rd 18: sc 30 (30)
Rd 19: [sc 3, dec], rep [] five more times (24)
Rd 20: sc 24 (24)
Rd 21: [sc 2, dec], rep [] five more times (18)
Rd 22: [sc, dec], rep [] five more times (12)
Rd 23: dec 6 (6)
Fasten off, leaving a 6-8 inch tail. Using your tapestry needle, sew through the remaining 6 stitches and pull tight.
Body
Use A
Rd 1: Create MR, ch 1, sc 6 (6)
Rd 2: [inc], rep [] five more times (12)
Rd 3: [sc, inc], rep [] five more times (18)
Rd 4: [sc 2, inc], rep [] five more times (24)
Rd 5: [sc 3, inc], rep [] five more times (30)
Rd 6: [sc 4, inc], rep [] five more times (36)
Rd 7: [sc 5, inc], rep [] five more times (42)
Rd 8: [sc 6, inc], rep [] five more times (48)
Rd 9: [sc 7, inc], rep [] five more times (54)
Rd 10: [sc 8, inc], rep [] five more times (60)
Rds 11-16: sc 60 (60)
Rds 17-20: sc 60 (60)
Rd 21: [sc 8, dec], rep [] five more times (54)
Rd 22: [sc 7, dec], rep [] five more times (48)
Rd 23: [sc 6, dec], rep [] five more times (42)
Rd 24: [sc 5, dec], rep [] five more times (36)
Rds 25 and 26: sc 36 (36)
Rd 27: [sc 4, dec], rep [] five more times (30)
Rd 28: [sc 3, dec], rep [] five more times (24)
Rds 29 and 30: sc 24 (24)
Stuff with fiber fill, adding more as necessary
Rd 31: [sc 2, dec], rep [] five more times (18)
Rd 32: [sc, dec], rep [] five more times (12)
Fasten off and leave a 12” tail to sew head on. Add any more fiber fill necessary.
Arms
Make 2
Rd 1: Create MR, ch 1, sc 6 (6)
Rd 2: inc 6 (12)
Rd 3: [sc, inc], rep [] five more times (18)
Rds 4-6: sc 18 (18)
Rd 7: [sc, dec], rep [] five more times (12)
Rds 8-15: sc 12 (12)
Fasten off, leaving an 8-10 inch tail to sew onto body.
Legs
Make 2
Rd 1: Create MR, ch 1, sc 6 (6)
Rd 2: inc 6 (12)
Rd 3: [sc, inc], rep [] five more times (18)
Rd 4: [sc 2, inc], rep [] five more times (24)
Rds 5-11: sc 24 (24)
Rd 12: [sc 2, dec], rep [] five more times (18)
Rds 13-18: sc 18 (18)
Fasten off, leaving an 8-10 inch tail to sew onto body.
Snout
Rd 1: Create MR, ch 1, sc 6 (6)
Rd 2: inc 6 (12)
Rd 3: [sc, inc], rep [] five more times (18)
Rd 4: sc 18 in blo (18)
Rds 5 and 6: sc 18
Fasten off, leaving a 6-8 inch tail to sew onto head.
Ears
Make 2
Rd 1: Create MR, ch 1, sc 6 (6)
Rd 2: inc 6 (12)
Rds 3-5: sc 12
Rd 6: [sc, inc], rep [] five more times (18)
Fasten off, leaving a 6-8 inch tail to sew onto head.
Tail
Tip: Crocheting in the back bump of the chain makes for a more finished look and is what I recommend for this tail.
ch 8
R 1: starting in second ch from hook, sc 3, (sc 2), sc 3 (8)
Assembly
First, sew the head to the body. I went through row three on the head. Weave in the end.
Then sew the snout to the head. I placed the snout on rows 7-14. Weave in the end.

Next, sew the ears on, making sure that they are mostly symmetrical. I began on the third row from the end on the top of the head and came down 7 rows. Weave in the ends.

Next, sew the arm openings together and sew the arms onto the body. I sewed them onto the sixth row down from the top. Weave in the ends.

Next, sew the legs on. I sewed them from rows 9-16 with 6.5 stitches between at the narrowest point. Weave in ends.

Lastly, sew the tail onto the center of the back on, roughly, row 11.

If you did not use safety eyes, attach your crocheted eyes or embroider your eyes now. Embroider the nostrils on the snout. I put them between rows 2 and 3, with two stitches between the narrowest point.
Pin it for later!